Exp 1 - gem5 & NVMain
Skip all the fuss of building errors
# docker pull airmisuzu/gem-nvmain-parsec
gem5
Getting and building gem5
Follow the step on the official doc for building gem5.
$ git clone https://gitee.com/mirrors/gem5      # if you don't have google access
# apt install build-essential git m4 scons zlib1g zlib1g-dev \
>   libprotobuf-dev protobuf-compiler libprotoc-dev libgoogle-perftools-dev \
>   python-dev python-six python libboost-all-dev pkg-config
$ scons build/X86/gem5.opt -j2      # 2 threads may eat up to 3GiB of ram
... and wait for hours :)
If you already have some version of protobuf runtime library installed, don’t reinstall a different version, otherwise gem5 may report runtime linkage error.
Running System-call Emulated (SE) test
$ ./build/X86/gem5.opt configs/example/se.py -c tests/test-progs/hello/bin/x86/linux/hello
Running Full System (FS) test
Getting system image files
$ wget http://www.m5sim.org/dist/current/x86/x86-system.tar.bz2
$ tar zxf x86-system.tar.bz2 && mv x86-system fs-image
$ wget http://www.m5sim.org/dist/current/m5_system_2.0b3.tar.bz2
$ tar zjf m5_system_<version>.tar.bz2
$ cp m5_system_<version>/disks/linux-bigswap2.img fs-image/disks
$ ls -R fs-image
fs-image/:
binaries disks

fs-image/binaries:
x86_64-vmlinux-2.6.22.9

fs-image/disks:
linux-bigswap2.img  linux-x86.img
$ M5_PATH=../fs-image build/X86/gem5.opt configs/examples/fs.py \
>   --disk-image linux-x86.img --kernel x86_64-vmlinux-<version>
$ telnet 127.0.0.1:3456     # the default port, ymmv
^D to exit.
NVMain integrated with gem5
Patching NVMain to gem5
see NVMain README 2b. Simulator-Connected Simulation
$ pwd
/path/to/gem5
$ hg qinit      # if your gem5 clone does not use mercury
$ hg qimport /path/to/nvmain/patches/gem5/nvmain<tab>
$ hg qpush
Git-patch is (said to be) outdated.
$ scons EXTRAS=../nvmain build/X86/gem5.opt
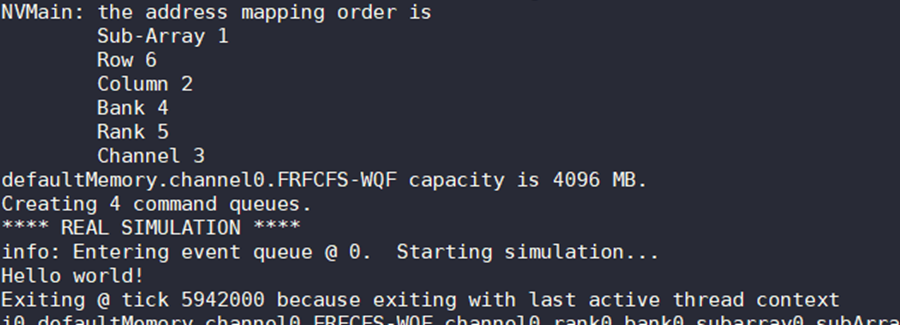
Running SE
$ M5_PATH=../full_system_images/ ./build/X86/gem5.opt \
>   configs/example/se.py -c tests/test-progs/hello/bin/x86/linux/hello \
>   --caches --l2cache --mem-type=NVMainMemory \
>   --nvmain-config=../nvmain/Config/PCM_ISSCC_2012_4GB.config
Running PARSEC
Getting PARSEC
$ wget -P ../full_system_images/binaries http://www.cs.utexas.edu/~parsec_m5/x86_64-vmlinux-2.6.28.4-smp
$ wget -P ../full_system_images/binaries http://www.cs.utexas.edu/~parsec_m5/tsb_osfpal
$ wget -P ../full_system_images/disks http://www.cs.utexas.edu/~parsec_m5/x86root-parsec.img.bz2
$ bzip2 -d x86root-parsec.img.bz2
$ wget -P .. http://www.cs.utexas.edu/~parsec_m5/TR-09-32-parsec-2.1-alpha-files.tar.gz
$ tar zxf ../TR-09-32-parsec-2.1-alpha-files.tar.gz
$ ../TR-09-32-parsec-2.1-alpha-files/writescripts.pl blackholes 4
Running PARSEC on FS
$ M5_PATH=../full_system_images/ ./build/X86/gem5.opt configs/example/fs.py \
>   -n 2 --scripts=../TR-09-32-parsec-2.1-alpha-files/blackholes_4c_test.rcS \
>   --disk-image=x86root-parsec.img --kernel=x86_64-vmlinux-<version>-smp
And telnet into the system from another terminal instance.

NVMain
Getting NVMain
A later version of NVMain can be found here (https://github.com/cyjseagull/gem5-nvmain-hybrid-simulator), along with a compatible version of gem5.
Use the latest version you can find! SEAL-UCSB/NVMain is outdated and will refuse to compile with gem5 with some ImportError.
Building NVMain
see NVMain README 2a. Trace Simulation
# apt install scons
$ scons --bulid-type=fast
For build error relating to
from gem5 import TransformComment it out.
Standalone test
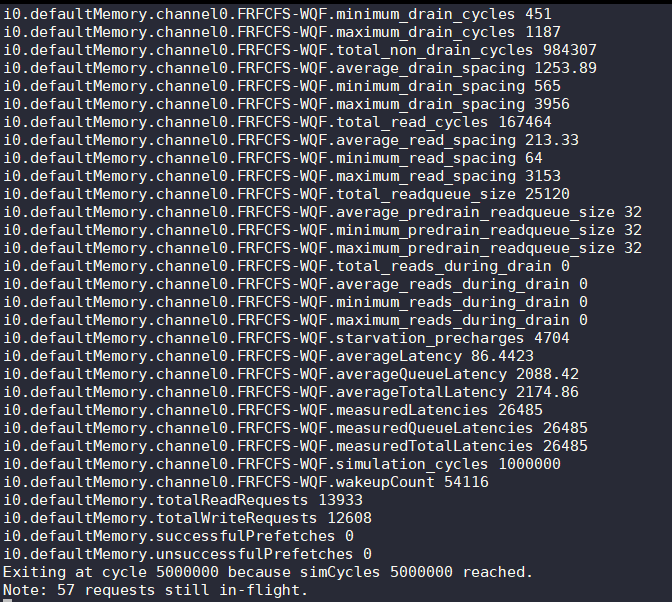
see README 3. Running NVMain
$ # ./nvmain.fast CONFIG_FILE TRACE_FILE [Cycles]
$ ./nvmain.fast Config/PCM_ISSCC_2012_4GB.config Tests/Traces/hello_world.nvt 1000000
Injecting FPC
Alaa R. Alameldeen and David A. Wood. “Frequent Pattern Compression: A Significance-Based Compression Scheme for L2 Caches.” 2004.
File structure
nvmain/
 + DataEncoders/
 |  + FlipNWrite/               // reference implementation
 |  + FPC/                      // our implementation
 |  |   + FPC.h
 |  |   + FPC.cpp
 |  |   + SConscript
 |  + DataEncoderFactory.h
 |  + DataEncoderFactory.cpp
 |  |
 ...
- Implement FPC (src)
- Header
- Your own implementation should be a subclass of
NVM::DataEncoder(seesrc/DataEncoder.h). - You may define stats you want to track as private variables.
- Your own implementation should be a subclass of
- Implementation
- constructor: initialize stats
SetConfig(): likeFPC::SetConfig(), alloc an emptyParamsstructRegisterStats(): register stats with macroAddStat(), name of argument will be used as the stat’s nameRead(): we don’t need to implement thisWrite()req->datato get data to be writen- use a word pointer (if strictly implementing FPC, this will be
int32_t) to traverse data - see if the word falls into one of the 7 compressible categories,
and increment your counter
- zero run (up to 8 zeroes)
- 4-bit sign-extend (
ffff fff 1xxxor0000 000 0xxx)word >> 3 == -1 || word >> 3 == 0
- one byte sign-extended
- halfword sign-extended
- halfword padded with zero halfword (
xxxx 0000) - two halfwords, each a byte sign-extended
- word consisting of repeated bytes (
abab abab) - uncompressed
- Header
-
Create build script
DataEncoders/FPC/SConscript(from FilpNWrite’s script) -
Add to factory
DataEncoderFactory::CreateDataEncoder() -
Run some workload and get data pattern distribution
Append
DataEncoder FPCto the end of the config file, soDataEncoderFactoryknows which one to use.$ ./nvmain.fast Config/PCM_MLC_example.config Tests/Traces/hello_world.nvt 1000000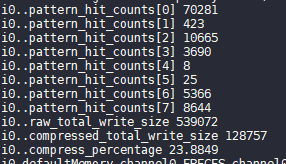
It should be noted that this implementation does not actually write compressed data to cache, for it would rely on some sort of addressing scheme and it is not given in the paper. The FPC algorithm compresses fixed-length word (or words if zero run) into varaible length bits (padded to bytes), causing complexity in addressing and decompression.
Exp 2 - Quartz
Choice of experiment platform
- Quartz supports Intel CPUs from Core i5/7-2xxx~4xxxx and Xeon v1~3.
- Quartz cannot run in hybrid simulation mode with a single CPU, you’ll need a dual-socket server for accurate simulated results.
- Quartz is not compatible with linux kernels provided by containers and cloud images.
Getting and building Quartz
Follow the doc
$ git clone https://github.com/HewlettPackard/quartz && cd quartz
$ mkdir build && cd build
$ cmake3 ..     # or just cmake if version >= 2.8
$ make clean all
$ ls src/lib
... libnvmemul.so ...
Port hashmap to NVM
The linear-probing hash map I use is DaivdLeeds/hashmap, this implementation is compact, and comes with a performance benchmark out of the box.
You will need pmalloc(), pfree(), pflush() and mfence() from libnvmemul
to code for NVM, add them to your header file.
#ifdef WITH_NVMEMUL
#include <stdint.h>
/* NVM management
 * Run program with LD_PRELOAD pointing to pre-compiled libnvmemul.so
 * and NVMEMUL_INI to nvmemul.ini
 */
void *pmalloc(size_t size);
void pfree(void *start, size_t size);
void pflush(uint64_t *addr);
void pflush_n(void *addr, size_t size);
#define pflush_pobj(p) pflush_n((p), sizeof(*(p)))
#define asm_mfence()				\
({						\
	__asm__ __volatile__ ("mfence");	\
})
void *pstrdup(const void *s);
void pkeyfree(void *k);
#endif
Then, you may replace all memory-oriented alloc(), memxxx() and strxxx()
family with NVM-oriented counterparts.
To emulate NVM write latency, you must explicitly call pflush() and mfence()
after critical memory writes.
    /* Free the key */
    if (hb->key_free) {
        hb->key_free(removed_entry->key);
    }
    --hb->size;
#ifdef WITH_NVMEMUL
    pflush((uint64_t*)&hb->size);
    asm_mfence();
#endif
I don’t know if this is the right way to use
clflushandmfence.
A modified version can be found at my repo.
Building hashmap with Quartz
Remember to link libnvmemul.so.
# CMakeLists.txt

if(WITH_NVMEMUL)
    add_definitions(-DWITH_NVMEMUL)
endif(WITH_NVMEMUL)

...

if(WITH_NVMEMUL)
    link_directories(/root/zxg-workspace/quartz/build/src/lib)
    target_link_libraries(hashmap -lnvmemul)
endif(WITH_NVMEMUL)
Run with different emulated latency
Modify emulated latency in quartz/nvmemul.ini, note that hybrid emulation is
not supported on non-numa machines.
Run your application (i.e. hashmap benchmark) within the Quartz environment.
# scripts/runenv.sh ../hashmap/build/test/hashmap_test