Ceph Deployment
Basic Concepts
Ceph provides Ceph Object Storage, Ceph Block Device services to Cloud Platforms.
Composition
A Ceph Storage Cluster requires at least one
-
Ceph Monitor
ceph-monMaintains maps of cluster state.
-
Ceph Manager
ceph-mgrKeeps track of runtime metrics and current state of the Ceph cluster.
-
Ceph Object Storage Daemon (OSD)
ceph-osdStores data, handles data replication, recovery, rebalancing, and provides some monitoring information to Ceph Monitors and Managers (by checking other Ceph OSD Daemons for heartbeat).
-
Ceph Metadata Server (MDS)
ceph-mdsStores metadata on behalf of Ceph File System (i.e., Ceph Block Devices and Ceph Object Storage do not use MDS).

The CRUSH Algorithm
Ceph stores data as objects within logical storage pools. Using the CRUSH algorithm, Ceph calculates which placement group should contain the object, and further calculates which Ceph OSD Daemon should store the placement group.
Installation and Deployment
Service Node Setup
Do this for all service nodes.
-
User with password-less
sudoprivilege namedcephuser# useradd -d /home/ceph -m cephuser # create user if not exists # passwd cephuser # enter password # echo "cephuser ALL = (root) NOPASSWD:ALL" | sudo tee /etc/sudoers.d/ceph # password-less sudo # chmod 0440 /etc/sudoers.d/ceph # sed -i "s/Defaults requiretty/#Defaults requiretty"g /etc/sudoers # tty-less sudoYou may NOT name the user
ceph, for Ceph software may use this name. -
Check hostname
Server nodes’ hostnames must be identical to their hostnames on admin node.
-
Install NTP
Admin Node Setup
- Ensure connectivity with password-less SSH capability
-
Add nodes to hosts for mnemonics purposes
ceph-deployactually requires nodes to be specified by hostnames, making this step necessary.192.169.xxx.xxx ceph-mon1 192.168.xxx.xxx ceph-osd1 -
Configure password-less SSH connections
Otherwise
ceph-deploywould prompt for password repeatedly.-
Initialize SSH keys
$ ssh-keygen -
Associate aliases to SSH connections
 # ~/.ssh/config
 Host ceph-mon1
     Hostname ceph-mon1      # the hostname in /etc/hosts
     User ceph               # Ceph user on service node
$ chmod 644 ~/.ssh/config -
Store public keys
 $ ssh-keyscan ceph-mon1 ceph-osd1 ... >> ~/.ssh/known_hosts
 $ ssh-copy-id ceph-mon1     # enter passwords once and for all!
 $ ssh-ccpy-id ceph-osd1
 $ ...
-
-
-
Install
ceph-deploy# apt install ceph-deploy # Debian / Ubuntu # yum install epel-release # RHEL / CentOS # yum install ceph-deploy
Deployment
Switch to a dedicate working directory, say
mkdir cluster && cd cluster, before you proceed.
-
Create storage cluster
$ ceph-deploy new ceph-osd1 ceph-osd2 ...This step only ensures connectivity and generates a configuration file on current admin node’s working directory. Actual storage service is not up yet.
-
Install software on all nodes
$ ceph-deploy install [--release {release}] ceph-mon1 ceph-osd1 ...Packages in official CentOS repo is outdated, and may try to download from
http://ceph.com/xxxx, not the updatedhttps://download.ceph.com/xxxx. To correct this, you may-
$ export CEPH_DEPLOY_REPO_URL=http://mirrors.163.com/ceph/{dist}-{release} $ export CEPH_DEPLOY_GPG_URL=http://mirrors.163.com/ceph/keys/release.asc - edit URLs in
/usr/lib/python2.7/site-packages/ceph_deploy/hosts/centos/install.py.
To truely uninstall Ceph,
$ ceph-deploy purge node1 node2 ... $ ceph-deploy purgedata node1 node2 ... $ ceph-deploy forgetkeys # yum remove `yum list installed | grep ceph | awk '{print $1}'` # rm -rf /var/run/ceph # vgremove ceph-xxxxx -
If you have more than one network interface, you must have the following option configured and pushed to service nodes.
[global]
public_network=xxx.xxx.xxx.xxx/xx
Push config file and restart Ceph service to make new configs in effect.
$ ceph-deploy --overwrite-conf config push node1 node2 ...
$ ssh node1 sudo systemctl restart ceph.target
Deploying Ceph on a one-node cluster can cause deadlock!
Before you continue to create monitors, you must have the following options configured and pushed to service nodes.
[global]
osd_crush_chooseleaf_type = 0     # let CRUSH navigate to OSDs instead of hosts
osd_pool_default_size = 1
osd_pool_default_min_size = 1     # allow PGs to provide service at 'undesired' state
-
Create monitors
 $ ceph-deploy mon create ceph-mon1
 $ ceph-deploy gatherkeys ceph-mon1
On CentOS, if encountered error throwing this message
[ceph-deploy.mon][ERROR] Failed to execute command: /usr/sbin/service ceph -c /etc/ceph/ceph.conf start mon.{node}It may due to
ceph-deploybeing outdated (for it’s invokingserviceinstead of the more mordern, feature-richsystemctl), or lack of LSB (Linux Standard Base) support.Fix it by installing the latest
ceph-deployscripts and theredhat-lsbpackage.If your monitor starts but reported to be stuck at
probingstate, there is a good chance that IP addresses for monitors inmonmapare broken. Please ensure that- The IPs are correct
- No mixed use of IPv4 and IPv6 (e.g. using IPv4 for
public_networkwithms_bind_ipv6 = true)
If your monitor starts but reported to be stuck at
electingstate, you may have a clock drift situation. You may find the following configuration helpful.[global] mon_force_quorum_join = true # prefered if debugging mon_clock_drift_allowed = 5.0 # in seconds -
Register admin node of the cluster
$ ceph-deploy admin ceph-adminNow you may use
cephCLI tool without having to specify the monitor address andceph.client.admin.keyringbefore you execute a command. -
Deploy a manager daemon
$ ceph-deploy mgr create ceph-mgr1 -
Add OSDs
$ ceph-deploy osd create --data /dev/sdx ceph-osdx -
Check cluster health
$ ssh ceph-node sudo ceph health $ ssh ceph-node sudo ceph -s -
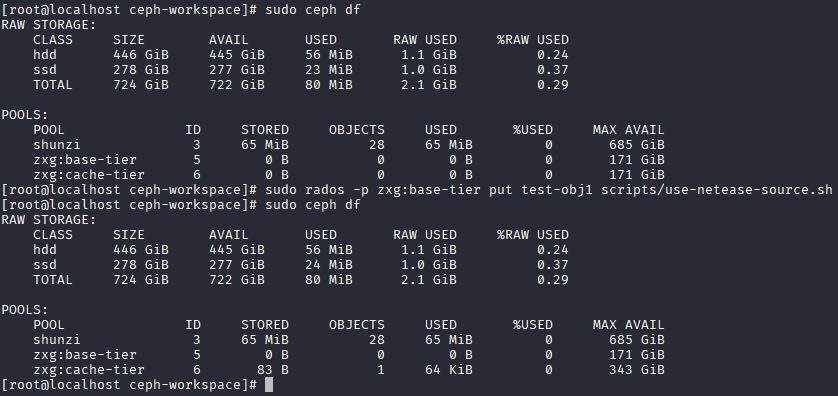
[Optional] Testrun: create / delete object
 $ echo 'something' > testfile
 # ceph osd pool create mytest 30    # 30 PGs, too few will cause RADOS to deadlock
 # rados --pool=mytest put test-obj1 ./testfile
 # rados -p mytest ls
 # rados -p mytest rm test-obj1
Cache Tiering

The Ceph objecter handles where to place the objects and the tiering agent determines when to flush objects from the cache to the backing storage tier.
The cache tier and the backing storage tier are completely transparent to Ceph clients.
cache-mode
-
writebackFlushing is performed asynchronously.
-
readproxyUse any objects that already exists in the cache tier, but does not migrate data on cache miss.
Useful for transitioning from
writebackmode to disable cache. -
readonlyPromotes objects to cache on read operations only, write operations are forwarded to base tier.
Updates on base tier are not synced to cache tier.
-
none
Creating a Cache Tier
Settings up a cache pool follows the same procedure as the standard storage scenario, but with this difference: the drives for the cache tier are typically high performance drives that reside in their own servers and have their own CRUSH rule. When setting up such a rule, it should take account of the hosts that have the high performance drives while omitting the hosts that don’t.
If you want PGs of cache pools only on SSDs and those of cold storage pools only on HDDs, you may trivially create dedicated CRUSH rules and assign them to pools.
# # ceph osd crush rule create-replicated <name> <root> <leaf type> [<device class>]
# ceph osd crush rule create-replicated hdd_rule default host hdd
# ceph osd crush rule create-replicated ssd_rule default host ssd
# ceph osd pool set cache-tier-pool crush_rule ssd_rule
# ceph osd pool set base-tier-pool crush_rule hdd_rule
A complete reshuffling is required for CRUSH rule changes.
For more information, see Manually Editing a CRUSH Map for details.
You may manually assign device class to devices if their device classes are not inferred correctly.
# ceph osd crush rm-device-class osd.2 osd.3
# ceph osd crush set-device-class ssd osd.2 osd.3
# ceph osd tier add base-tier-pool cache-tier-pool
# ceph osd tier cache-mode cache-tier-pool writeback
# ceph osd tier set-overlay base-tier-pool cache-tier-pool
# # all options below required
# ceph osd pool set cache-tier-pool hit_set_type bloom
# ceph osd pool set cache-tier-pool hit_set_count 12
# ceph osd pool set cache-tier-pool hit_set_period 14400
# ceph osd pool set cache-tier-pool target_max_bytes {size}
# # set evict ratio, otherwise always evict everything in cache tier
# ceph osd pool set cache-tier-pool cache_target_dirty_ratio 0.4
# ceph osd pool set cache-tier-pool cache_target_dirty_high_ratio 0.6
# ceph osd pool set cache-tier-pool cache_target_full_ratio 0.8
All client requests will be blocked when
target_max_bytesortarget_max_objectsreached, and flushing / evicting will start.
Changes to base tier will now be handled by cache tier.
Development Build Environment Setup
written at 2019.11.27
Python2 Issues
Forget it, just stick to what Ceph wants you to do!
As the counsul dropping support for Python2, some packages’ versions are no longer
allowed to be left unspecified, for more-itertools (required by tox) and
pytest will complain.
A temporary fix will be appending more-itertools==4.1.0 to every occurance of
tox, and fixing pytest version to <=4.6:
-
Append
'more-itertools == 4.1.0'to thepipcall found ininstall-deps.sh/populate_wheelhouse().function populate_wheelhouse() { local install=$1 shift # although pip comes with virtualenv, having a recent version # of pip matters when it comes to using wheel packages PIP_OPTS="--timeout 300 --exists-action i" pip $PIP_OPTS $install \ 'setuptools >= 0.8' 'pip >= 7.0' 'wheel >= 0.24' 'more-itertools == 4.1.0' 'tox >= 2.9.1' || return 1 # ~~~~~~~~~~~~~~~~~~~~~~~~~ <- here! # pip $PIP_OPTS $install \ # 'setuptools >= 0.8' 'pip >= 7.0' 'wheel >= 0.24' 'tox >= 2.9.1' || return 1 if test $# != 0 ; then pip $PIP_OPTS $install $@ || return 1 fi } -
Append
more-itertools==4.1.0on every failure the script complains, includingsrc/ceph-volume/plugin/zfs/requirements_dev.txtsrc/pybind/mgr/orchestrator_cli/requirements.txtsrc/pybind/mgr/ansible/requirements.txt
-
Fixing
pytest<=4.6on every failure the script complains, includingsrc/pybind/mgr/ansible/requirements.txt
-
Switch to
python3for$python_commandin package build script.make-dist: in method_python_autoselect()
Build & Install Customized Ceph (rpm)
On the dev machine
- Run script
./install-deps.shto install required utilities. - Make your modifications and commit changes to Git.
-
Run script
./make-srpm.shfound in project root.You may put your own copy of Boost under project root to skip this possibly length process.
-
Compile the output source package.
$ rpmbuild --rebuild ./ceph-{version}.el7.src.rpmOutput binary packages can be found at
~/rpmbuild/RPMS/. -
Copy binary packages to the target machine.
You may want to ignore the gigantic debuginfo package.
On the target machine
-
Install the
epel-releasepackage, otherwise some dependencies won’t resolve. -
Install all the rpms.
构建并安装自定义 Ceph(rpm)
在开发机上
- 运行脚本
./install-deps.sh拉取依赖; - 修改 Ceph,并将修改提交至本地 Git;
-
运行脚本
./make-srpm.sh;若不希望从远端下载 Boost 库,可以将预先下载好的 Boost 源码压缩包复制到项目根目录。
-
编译生成二进制安装包,输出文件位于
~/rpmbuild/RPMS/下;$ rpmbuild --rebuild ./ceph-{version}.el7.src.rpm -
将所有安装包拷贝到目标机器上;
这里可以选择不安装调试信息包 debuginfo。
在目标节点上
- 安装
epel-release包,否则安装时部分依赖无法自动拉取; - (使用
yum或其他包管理软件)安装所有包。
安装完成后,在部署时可以跳过 ceph-deploy install 步骤。